


With Mother's Day around the corner- seriously there's only 1 week! I feel like it really snuck up on me with Easter being so late. I came across this tutorial & it got me thinking. There's nothing a mother loves more than adorable pictures of her children or family & what if those pictures were displayed around a beautiful flowering plant? This would be great for Grandmas too!

What you'll need:
small flower pot
fabric (fat quarter- for small pots)
1/2" elastic
bias tape
clear vinyl (one of those bags your sheets come in works well)
pictures of your kids/family
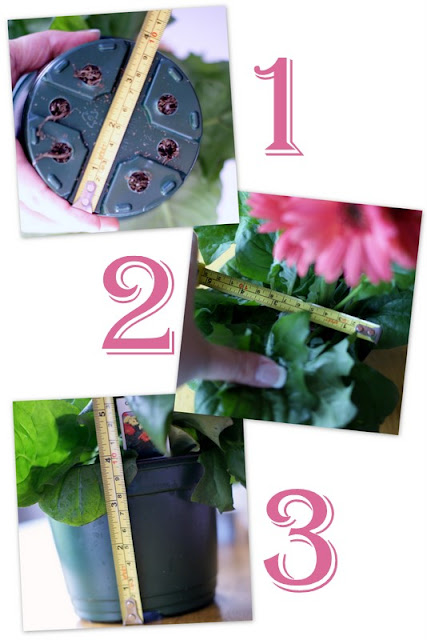
First we'll take some measurements.
1.Measure the diameter of the bottom.
2. Then the top of the pot.
1.Measure the diameter of the bottom.
2. Then the top of the pot.
3. Lastly, the height.

Now we need to find the circumference of the top & bottom circles so use this equation:
Diameter x pi (3.14159) = Circumference
Take the height measurement + 1/2 of the bottom diameter + 1 inch = Trapezoid height
Now cut out a trapazoid shape using the top circle circumference for the length of the top, the bottom circle circumference for the length of the bottom, the Trapezoid height from the equation above. Add seam allowances to all sides.

Cute ONE trapezoid in this shape.
My measurements were:
top diameter 5", so the circumference is 15.7 + .5 seam allowance = 16.2"
bottom diameter is 4", so the circumference is 12.5 + .5 seam allowance = 13"
Flower pot height is 4", so the Trapezoid height will be (4 + 2 +1) = 7"
PS this is very similar to Delia's Easter Basket Liner.
Now, cut out your fabric and iron the top down 1" and the bottom up 1/2" then again half the diameter of the bottom of the pot. This will give you the proper size for the front of the wrap.


Now, cut out your fabric and iron the top down 1" and the bottom up 1/2" then again half the diameter of the bottom of the pot. This will give you the proper size for the front of the wrap.

Now we are ready to make the photo pocket!
Decide the size of the photo you are using & make sure it will fit on the front of the wrap (remember there will be a border so you don't want to crop it too close to the people in the picture!).
Cut a piece of the vinyl to the size you want your pocket to be.

Now we are going to sew the bias tape around the vinyl. Open up your bias tape and start by lining up the raw edge of bias tape along bottom edge of vinyl. Leave a couple inches of bias tape unsewn so we can attach it to the end when we get around the whole vinyl piece.
Now when you get to the first corner, stop 1/4" away and fold it up so that it forms a 45 degree angle in the corner. Fold the bias tape back over itself and sew down the new side doing the same thing at each corner until you have returned to where you started. **I did not pin because I didn't want holes in my vinyl & I slide some tissue paper under the vinyl to help it not stick to the sewing maching.

When you return to where you began, stop and inch or so away and fold the tails so that their edges meet and press to create a crease. Sew those 2 pieces together along the crease then open back up and continue sewing your bias tape to the vinyl.

Now fold the bias tape over and lets attach it to the front side!
Make sure to miter the corners. It may not look perfect (it's hard working with sticky vinyl!).

We're almost done! Grab your trapezoid shaped fabric and sew along the hem at the top (I did a double row because orginally I was going to add elastic but it turns out it isn't needed). Then sew your photo pocket on- remember to leave the top open so you can slide the picture in ;)
Then sew a very loose stich along the bottom making sure to backstitch as the beginning so you don't pull your thread out. Then pull the fabric tight. Not pictured is sewing along the side seam to finish this baby off!

Now slide your picure in and voila you have a great gift ready for mom or grandma! I added a little rick rac around the top... there are really so many ways you could embellish this!


Very cute idea!! Yeah, it's weird with Easter being so late -- I feel like May snuck up on me!
ReplyDeleteAwesome idea! Our grandmas would love this! Honestly, I see math equations and my head goes into panic mode or something :P
ReplyDeleteAdorable idea, Erica! Love this. I'm not ready for Mother's Day, either :)
ReplyDeletewonderful detailed post. thanks fro sharing tis idea
ReplyDeleteKAT
"for" and "this" I can spell, just have trouble typing sometimes
ReplyDeleteKAT
That's a cute idea, and I especially like that the photo can be changed. I know many moms and grandmas who would love one of these.
ReplyDeleteHow cute! I love that you can change out the picture year round!
ReplyDeleteErica this is the sweetest idea nd simply adorable! Thanks so much for linking to the Sunday Showcase - I greatly appreciate it. I have featured this today. Hope you are enjoying your week ~ Stephanie Lynn
ReplyDeletewww.bystephanielynn.com
Wow! That is so cute! I LOVE the ricrac. Dang it - I NEED to learn to sew! :)
ReplyDeleteVery nice idea! Thanks!
ReplyDeleteThis is a cute idea! My mom would love this! I featured this on my friday favorites!
ReplyDeletehttp://www.lilbitofus.com/2011/05/friday-favorites.html
just linked this article on my facebook account. it’s a very interesting article for all.
ReplyDeleteGift Ideas For Boy