Sunday, May 1, 2011

Flower Pot Photo Wrap

With Mother's Day around the corner- seriously there's only 1 week!  I feel like it really snuck up on me with Easter being so late.  I came across this tutorial & it got me thinking.  There's nothing a mother loves more than adorable pictures of her children or family & what if those pictures were displayed around a beautiful flowering plant?  This would be great for Grandmas too! 


What you'll need:
small flower pot
fabric (fat quarter- for small pots)
1/2" elastic
bias tape
clear vinyl (one of those bags your sheets come in works well)
pictures of your kids/family

First we'll take some measurements.
1.Measure the diameter of the bottom.
2. Then the top of the pot.
3. Lastly, the height.
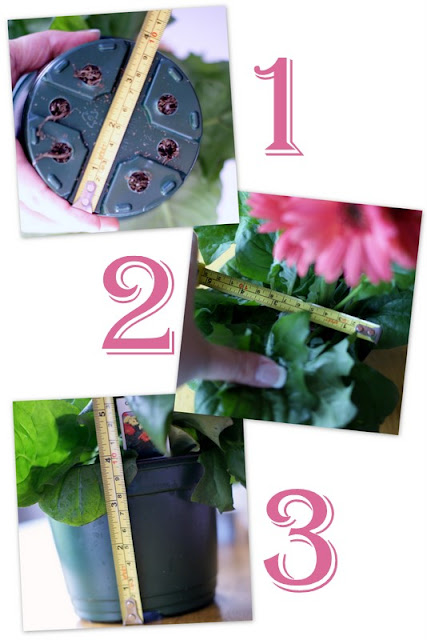

Now we need to find the circumference of the top & bottom circles so use this equation:
Diameter x pi (3.14159) = Circumference

Take the height measurement + 1/2 of the bottom diameter + 1 inch = Trapezoid height

Now cut out a trapazoid shape using the top circle circumference for the length of the top, the bottom circle circumference for the length of the bottom, the Trapezoid height from the equation above.  Add seam allowances to all sides.

Cute ONE trapezoid in this shape.

My measurements were:
top diameter 5", so the circumference is 15.7 + .5 seam allowance = 16.2"
bottom diameter is 4", so the circumference is 12.5 + .5 seam allowance = 13"
Flower pot height is 4", so the Trapezoid height will be (4 + 2 +1) = 7"
PS this is very similar to Delia's Easter Basket Liner.

Now, cut out your fabric and iron the top down 1" and the bottom up 1/2" then again half the diameter of the bottom of the pot.  This will give you the proper size for the front of the wrap.

Now we are ready to make the photo pocket!
Decide the size of the photo you are using & make sure it will fit on the front of the wrap (remember there will be a border so you don't want to crop it too close to the people in the picture!).

Cut a piece of the vinyl to the size you want your pocket to be.
Now we are going to sew the bias tape around the vinyl.  Open up your bias tape and start by lining up the raw edge of bias tape along bottom edge of vinyl.  Leave a couple inches of bias tape unsewn so we can attach it to the end when we get around the whole vinyl piece.
Now when you get to the first corner, stop 1/4" away and fold it up so that it forms a 45 degree angle in the corner.  Fold the bias tape back over itself and sew down the new side doing the same thing at each corner until you have returned to where you started.  **I did not pin because I didn't want holes in my vinyl & I slide some tissue paper under the vinyl to help it not stick to the sewing maching.

When you return to where you began, stop and inch or so away and fold the tails so that their edges meet and press to create a crease. Sew those 2 pieces together along the crease then open back up and continue sewing your bias tape to the vinyl.
Now fold the bias tape over and lets attach it to the front side!
Make sure to miter the corners.  It may not look perfect (it's hard working with sticky vinyl!).
We're almost done!  Grab your trapezoid shaped fabric and sew along the hem at the top (I did a double row because orginally I was going to add elastic but it turns out it isn't needed).  Then sew your photo pocket on- remember to leave the top open so you can slide the picture in ;)
Then sew a very loose stich along the bottom making sure to backstitch as the beginning so you don't pull your thread out.  Then pull the fabric tight.  Not pictured is sewing along the side seam to finish this baby off! 

Now slide your picure in and voila you have a great gift ready for mom or grandma! I added a little rick rac around the top... there are really so many ways you could embellish this!


post signature
UndertheTableandDreamingChocolate Drool and KissesSumo Sweet Stuff   

Wednesday, April 27, 2011

Gifts for the girls

I've been working my little tail off with a couple custom orders from my shop & for my sister in law.  My sister in law needed 2 baby shower gifts & I had just the perfect fabric!  I know that I am normally all about boys but I love how this set turned out and wanted to share! If you love it too I am listing it in my shop as well ;)

All wrapped up ready for one special mommy!

love this fabric!  
The set includes one burp cloth, one pacifier clip (notice the ruffles!), and one fold n go bib.

The back of the bib ready to go with a spoon and pack of Wet Ones.

PS- look at these little cuties I made for the boys to put in their Easter baskets.  I used this tutorial at  RevoluzZza.  My 2 year old picked the green buttons for eyes & I don't really like them... but they were super fast and easy so I could always make a new one.
I put little crosses inside the bunny's hearts to remind the boys the real reason we celebrate Easter.


 post signature

Friday, April 22, 2011

Easter Shout Out


Yesterday I received this cute little bunny in the mail.

I wanted to give a shout out to the Etsy business where I bought it.

I know how hard it is getting your Etsy business noticed.

This little bunny is a natural teething toy made from high quality wood, cut by hand, sanded satin smooth, and finished in a mixture of organic olive oil and beeswax (both of which are non-toxic and completely safe for children and animals).
They have a ton of other wood toys too.  Like this Wee Bicycle Rolling Toy.


I wish I would have seen this Spring Special they have.  If you buy 2 teethers you get free shipping!  Also, buy 3 teethers for a discount.   

post signature

Wednesday, April 20, 2011

Easter Crafts for Toddler

We've had our fair share of yucky weather lately which means we can't always get outside to play.  So I've been scrounging around for activities to keep my 2.5 year old busy.  I thought I might as well put them as a post in case some of you are in the same predicament!
PS- the crafts I chose had to be made with stuff I already had on hand.


Cotton ball Easter Bunny Craft by Crafts~N~Things for Children

*we did this today & it was a success!


Transparent Eggs by 4 Crazy Kings


Foam Egg Cups by Activity Village


Coffee Filter Easter Eggs by The Active Toddler


How fun are these Easter Bunny Racers by Cafe Mom on The Stir


Again, I love this!  Jelly Bean Bracelet by My Kids Make
(I think I'd have to make it but it would be a big hit!)


When all else fails here's a link to a ton of coloring pages.
post signature

Sunday, April 17, 2011

Little Gentleman's Faux Vest Onesie


It's almost Easter and if you're a procrastinator like me then you probably don't have anything for your little guy to wear. Yet. Go grab a onesie that fits your little man & an old skirt or pants from your garage sale pile and let's make a cute little Faux Vest Onesie!   


 I used Dana's flat front pants tutorial to make matching pants but I am not super thrilled at how mine turned out.  I didn't give him enough room in the tush. 

You will also need some paper to make your vest pattern, 2 buttons, a sewing machine, & sewing notions like thread & scissors.

First, take your onesie and fold it in half and draw lines where you see I've marked in red in the first picture above.  Then on the line that was drawn where the middle of the onesie is measure about 3" down from the top.  This will help create the dip in front.  Then use a straightedge and create a 'v' at the bottom & the slant from the shoulder to the mark you made on the middle line.  Now trace around the whole pattern 1/4" for your seam allowance (not pictured) & cut out your pattern. 


Cut out 2 of your pattern from the outside fabric & 2 of an interior fabric (I used an old button down shirt).  Remember the the pieces need to be mirror images so flip your pattern upside down for one side.
Then pin right sides together.Sew along all sides except the top shoulder area.  That will be kept open to turn this rightside out.


Sew along all sides except the top shoulder area.  That will be kept open to turn this rightside out. Clip all the corners & turn rightside out.  Press with an iron then topsitch 1/8" along all sides except the shoulder area.  I also did not topstich along the side that will be sewed along the side seam.


Now, match the side seams in the onesie.  Pin the outside edge of each vest piece along the side seams leaving about 3/4" below the arm pit.  Sew along the sides making sure to backstitch at the top & bottom.  The third picture is what it should look like now.


Now flip the top part on the shoulder back.  Then pin & sew the shoulder section on the vest so that the seam will be hidden under the top flap.  Before sewing make sure both sides match.


Measure and mark where you want your buttons to go. I overlapped the 2 sides slightly.  Then sew your buttons through both sides so that they will stay closed. 

You're all done & your little man now has something spiffy to wear on Easter or just out on the town ;)


ADORABLE!

post signature
Keeping It SimpleChocolate Drool and Kisses Photobucket


LinkWithin

Related Posts Plugin for WordPress, Blogger...