The other day when I posted about needing some guest bloggers, Chelsea from One Hot Crafty-Mama volunteered to help me out. She has a really cute pumpkin tutorial to share with you today. Thanks Chelsea!
Hello!! I'm Chelsea from One Hot Crafty-Mama. I was trying to come up with something easy and fun to do for the fall then I remembered some pumpkins that my mom had made when I was younger. Going off of that memory this is what I came up with, I would love for you to check out how to make them.
A couple of weeks ago I shared with you some pictures of fabric pumpkins I made and I promised a tutorial on how to make them. Here it is finally!!! These are really simple and you can make whatever size you want.
Materials needed:
scrap fabric (the body of your pumpkin)
a even smaller scrap of fabric (your stem)
pillow filler or a couple of grocery bags
embroidery floss and a large needle
thread and a regular needle
I wanted to make a bigger pumpkin this time. So I used about a half of a fat quarter.
Then I cut out a circle, you can trace something or just free hand it like I did.
Using the needle and thread I ran the thread around the edge of the circle and then tightened it creating a pouch. *Note: be careful to not allow the thread to go all the way through the what you just stitched.
Open the hole up a little bit and add your filler. I didn't have any pillow filler so I stuffed a couple of grocery bags in there and it worked great!!
Then tie your hole close.
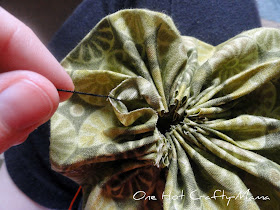
Now using your big needle and the floss, start your needle on the bottom of your pouch and push it up through the middle, don't let the floss go through completely bring the end of the floss around the outside of the pouch and tie it off in the middle. *Note: I used all the threads of the floss on this pumpkin on the others I used 4 of the threads.
Go around your pumpkin starting at the bottom up through the middle, to the top and then around the outside back to the bottom (I hope that makes sense), continue at spacing the thread how you want to.
This is what the bottom of mine looks like.
Here is the top. Tie off the floss I used the same spot that I started with. Now set it aside for a moment.
Now using your smaller piece of scrap create and strip. However wide or long is up to the side of your pumpkin and how big you want the stem to be.
Fold the fabric in half lengthwise with the right sides together. Now either use your machine if its handy or hand sew the long sides together. Then flip the fabric outside out and sew the bottom together.
Now its time to attach the stem to the top. If you are making small pumpkins its easier to just hot glue the stems on otherwise sew it on.
Now enjoy your pumpkin!!!
Thanks again Chelsea, I love this & need to make some!
Thanks again Chelsea, I love this & need to make some!


Super cute! I love this little pumpkins that I have seen all over. I think you did a really great job on yours! Thanks for sharing this, I may just have to make one as well. :)
ReplyDeleteThanks for discuss this, Love learning more on this topic. Extremely helpful!
ReplyDeleteThis article is really contains lot more information about This Topic. Its great.
ReplyDeleteI have you bookmarked to check out new stuff post. keep it up. Its greatt
ReplyDeleteExcellent site you’ve got here. I appreciate individuals like you! Take care!!
ReplyDelete
ReplyDeleteI absolutely love your blog
ReplyDeleteThis is an awesome motivating article.
ReplyDeleteI am satisfied that you simply shared this useful info with us.
ReplyDeleteIt is always so interesting to visit your site.